
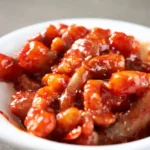
There’s nothing quite like recreating a restaurant favorite at home, especially regarding the sweet, tangy, and slightly spicy kick of Applebee’s Sweet Asian Chili Sauce. I’ve always loved this sauce drizzled over their crispy wonton tacos or as a dip for appetizers.
Recently, I decided to try making it myself, and to my delight, it turned out to be quite easy, with easy-to-find ingredients. I’m excited to share my homemade version of this sauce, which is perfect for adding a zesty twist to any dish!
Why I Decided to Make It Myself:
One day, after a fun evening at Applebee’s with friends, I couldn’t stop thinking about the unique blend of flavors in their Sweet Asian Chili Sauce. The combination of sweet and spicy was just perfect – not too overpowering, but flavorful enough to make every bite memorable. Inspired by my love for experimenting in the kitchen, I decided to try and recreate this sauce at home.
I researched a few different recipes online, experimented with some variations, and eventually developed my version that captured the essence of Applebee’s sauce, but with a personal touch.
Ingredients
To make this sauce, I started by gathering the following ingredients:
- 1/2 cup of sweet chili sauce: The base ingredient that gives the sauce its characteristic sweetness and heat. I used my favorite store-bought brand, but you can use any sweet chili sauce you like.
- 2 tablespoons of soy sauce: To add depth and a salty, umami flavor. I chose low-sodium soy sauce to control the saltiness.
- 1 tablespoon of honey: Adds a bit of natural sweetness that balances the heat and acidity.
- 1 tablespoon of rice vinegar: This provides a tangy note that complements the sweetness.
- 1 teaspoon of sesame oil: A small amount of sesame oil goes a long way in adding a nutty, aromatic flavor.
- 1/2 teaspoon of garlic powder: I love garlic, so I added this to enhance the savory aspect of the sauce.
- 1/2 teaspoon of ground ginger: This gives a subtle warmth and spiciness.
- 1/4 teaspoon of crushed red pepper flakes: To boost the heat, I added this, but it’s optional if you prefer a milder sauce.
Step-by-Step Instructions
Here’s how I made it:
- Combine the Ingredients: I started by pouring the sweet chili sauce into a small saucepan over medium heat. Next, I added the soy sauce, honey, and rice vinegar, stirring gently to combine all the ingredients.
- Add the Aromatics: I added the sesame oil, garlic powder, and ground ginger. These ingredients bring out the flavors that make the sauce stand out.
- Simmer the Sauce: I let the sauce simmer for about 5-7 minutes, stirring occasionally. This step allows the flavors to meld together, and the sauce to slightly thicken. I kept a close eye on it to prevent burning.
- Adjust Seasoning: At this point, I tasted the sauce and decided to add a pinch more of crushed red pepper flakes for an extra kick. If you like it spicier or sweeter, you can adjust the seasoning to your liking.
- Cool and Store: Once the sauce reached the desired consistency, I removed it from the heat and let it cool. I poured it into a glass jar and stored it in the fridge. It can last for up to two weeks, but it’s so delicious that it usually disappears much sooner!
Serving Suggestions:
Here are some of the ways I’ve used this sauce since perfecting it:
- As a Dip: It’s fantastic as a dipping sauce for spring rolls, chicken wings, or tempura. The balance of sweet and spicy elevates any appetizer.
- Glazing Meat: I’ve used it as a glaze for grilled chicken, shrimp, or even salmon. It adds a sticky, flavorful coating that caramelizes beautifully.
- Stir-fry Sauce: I tossed it with vegetables and noodles for a quick stir-fry. It brings a burst of flavor that makes the dish both satisfying and delicious.
- Salad Dressing: When diluted slightly with more rice vinegar and some olive oil, it makes an excellent salad dressing with an Asian twist.
Serving Suggestions:
Here are some of the ways I’ve used this sauce since perfecting it:
As a Dip
It’s fantastic as a dipping sauce for spring rolls, chicken wings, or tempura. The balance of sweet and spicy elevates any appetizer.
Glazing Meat
I’ve used it as a glaze for grilled chicken, shrimp, or even salmon. It adds a sticky, flavorful coating that caramelizes beautifully.
Stir-fry Sauce
I tossed it with vegetables and noodles for a quick stir-fry. It brings a burst of flavor that makes the dish both satisfying and delicious.
Salad Dressing
When diluted slightly with more rice vinegar and some olive oil, it makes an excellent salad dressing with an Asian twist.
Conclusion
Making Applebee’s Sweet Asian Chili Sauce at home was a fun and rewarding experience. Not only did I get to enjoy the delicious flavors I love, but I also had the satisfaction of knowing exactly what went into the sauce. Plus, I was able to tweak it to suit my personal preferences. I encourage you to try making it yourself – it’s a simple recipe that can add a lot of excitement to your cooking!
Applebee’s Sweet Asian Chili Sauce Recipe
Ingredients
- 1/2 cup sweet chili sauce
- 2 tablespoons soy sauce low-sodium preferred
- 1 tablespoon honey
- 1 tablespoon rice vinegar
- 1 teaspoon sesame oil
- 1/2 teaspoon garlic powder
- 1/2 teaspoon ground ginger
- 1/4 teaspoon crushed red pepper flakes optional, for extra heat
Instructions
- Combine the Ingredients: I started by pouring the sweet chili sauce into a small saucepan over medium heat. Next, I added the soy sauce, honey, and rice vinegar, stirring gently to combine all the ingredients.
- Add the Aromatics: I added the sesame oil, garlic powder, and ground ginger. These ingredients bring out the flavors that make the sauce stand out.
- Simmer the Sauce: I let the sauce simmer for about 5-7 minutes, stirring occasionally. This step allows the flavors to meld together, and the sauce to slightly thicken. I kept a close eye on it to prevent burning.
- Adjust Seasoning: At this point, I tasted the sauce and decided to add a pinch more crushed red pepper flakes for an extra kick. If you like it spicier or sweeter, you can adjust the seasoning to your liking.
- Cool and Store: Once the sauce reached the desired consistency, I removed it from the heat and let it cool. I poured it into a glass jar and stored it in the fridge. It can last for up to two weeks, but it’s so delicious that it usually disappears much sooner!