
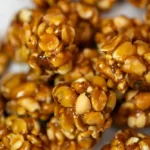
It feels really good to make old recipes that have been around for a long time. One recipe that reminds you of good memories and makes you feel cozy is the Old Fashioned Peanut Cluster. These yummy snacks are made of peanuts and chocolate. Many people have loved them for a long time.
Today, I want to talk about how I made a special recipe. I’ll tell you everything from choosing the ingredients to enjoying the finished dish.
Ingredients
To create these delightful peanut clusters, you will need the following ingredients:
- 2 cups of semi-sweet chocolate chips
- 1 cup of milk chocolate chips
- 2 cups of roasted peanuts (unsalted)
- 1 tablespoon of coconut oil (optional, for smoother chocolate)
Preparation
1. Gathering the Ingredients
I started by gathering all the necessary ingredients. Choosing high-quality chocolate and fresh, roasted peanuts is crucial for the best flavor. I opted for a combination of semi-sweet and milk chocolate chips to achieve a balanced sweetness.
2. Melting the Chocolate
Using a double boiler, I gently melted the chocolate chips. If you don’t have a double boiler, you can easily create one by placing a heatproof bowl over a pot of simmering water. Make sure the bowl doesn’t touch the water to prevent the chocolate from burning.
Adding a tablespoon of coconut oil at this stage can help the chocolate melt more smoothly and give the clusters a glossy finish. Stir the chocolate constantly until it’s fully melted and smooth.
3. Mixing in the Peanuts
Once the chocolate was perfectly melted, I removed it from the heat and stirred in the roasted peanuts. It’s important to ensure that the peanuts are evenly coated with the chocolate. This step can be quite therapeutic as the rich aroma of melted chocolate fills the kitchen.
4. Forming the Clusters
Next, I lined a baking sheet with parchment paper. Using a spoon, I dropped small mounds of the chocolate-peanut mixture onto the sheet. The size of the clusters can be adjusted according to your preference, but I aimed for about a tablespoon per cluster to make bite-sized treats.
5. Setting the Clusters
After forming the clusters, I placed the baking sheet in the refrigerator to let them set. This usually takes about an hour, but you can leave them in longer if needed. If you’re in a hurry, the freezer can speed up the process, although this can slightly alter the texture of the chocolate.
6. Enjoying the Clusters
Once the peanut clusters were completely set, I removed them from the refrigerator and savored the first bite. The combination of smooth, creamy chocolate and crunchy peanuts was simply irresistible. The clusters had a delightful balance of sweetness and saltiness, making them an ideal treat for any occasion.
Tips and Variations
- Adding a Twist: For a bit of variety, you can add other ingredients to the mix. Dried fruits like raisins or cranberries can add a chewy texture and a hint of tartness. For a more indulgent twist, try adding mini marshmallows or a sprinkle of sea salt on top before the clusters set.
- Storage: Peanut clusters can be stored in an airtight container in the refrigerator for up to two weeks. This makes them a convenient make-ahead treat for parties or as a sweet snack to have on hand.
- Gifting: These clusters also make fantastic homemade gifts. Simply package them in decorative tins or cellophane bags tied with a ribbon. They’re sure to bring joy to anyone who receives them.
Conclusion
Making Old Fashioned Peanut Clusters was not just a fun time in the kitchen but also brought back happy memories. The process was easy and fun, and the result was a bunch of yummy treats that my family and friends loved.
If you’re good at baking or just starting, this recipe is a great way to make something sweet and special. I hope you enjoy making and sharing these peanut clusters as much as I did.
Old Fashioned Peanut Cluster Recipe
Ingredients
- 2 cups of semi-sweet chocolate chips
- 1 cup of milk chocolate chips
- 2 cups of roasted peanuts unsalted
- 1 tablespoon of coconut oil optional, for smoother chocolate
Instructions
Gathering the Ingredients
- I started by gathering all the necessary ingredients. Choosing high-quality chocolate and fresh, roasted peanuts is crucial for the best flavor. I opted for a combination of semi-sweet and milk chocolate chips to achieve a balanced sweetness.
Melting the Chocolate
- Using a double boiler, I gently melted the chocolate chips. If you don't have a double boiler, you can easily create one by placing a heatproof bowl over a pot of simmering water. Make sure the bowl doesn't touch the water to prevent the chocolate from burning.
- Adding a tablespoon of coconut oil at this stage can help the chocolate melt more smoothly and give the clusters a glossy finish. Stir the chocolate constantly until it’s fully melted and smooth.
Mixing in the Peanuts
- Once the chocolate was perfectly melted, I removed it from the heat and stirred in the roasted peanuts. It's important to ensure that the peanuts are evenly coated with the chocolate. This step can be quite therapeutic as the rich aroma of melted chocolate fills the kitchen.
Forming the Clusters
- Next, I lined a baking sheet with parchment paper. Using a spoon, I dropped small mounds of the chocolate-peanut mixture onto the sheet. The size of the clusters can be adjusted according to your preference, but I aimed for about a tablespoon per cluster to make bite-sized treats.
Setting the Clusters
- After forming the clusters, I placed the baking sheet in the refrigerator to let them set. This usually takes about an hour, but you can leave them in longer if needed. If you’re in a hurry, the freezer can speed up the process, although this can slightly alter the texture of the chocolate.
Enjoying the Clusters
- Once the peanut clusters were completely set, I removed them from the refrigerator and savored the first bite. The combination of smooth, creamy chocolate and crunchy peanuts was simply irresistible. The clusters had a delightful balance of sweetness and saltiness, making them an ideal treat for any occasion.